schematic
Schematics are pre-defined node patterns to be placed somewhere in the world. They allow to create some complex figures or structures and repeat them with little random alterations.
A schematic tells in an area what nodes should be created, with a given probability for each node to appear.
Schematic specifier
Functions that use schematics are passed a schematic specifier. A specifier can have 3 forms:
- A .mts file name as a string (see Minetest_Schematic_File_Format)
- A raw data table
- A registered schematic identifier as a number, returned by minetest.register_schematic
Schematic file
You can write mts files in-game with the mod Schematic Editor or with minetest.create_schematic. See lua_api.txt for this method documentation.
Schematic table
The schematic table has 2 mandatories attributes and 1 optional
- size: the bounding box in nodes, a 3D vector
- data: the flat list of MapNode to write
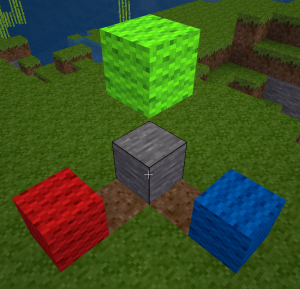
The data list is ordered in z, y, x. Than means for a 3x3x3 box it will be a list of 27 MapNodes.
- The first 3 are positioned at the stone block, at the node between and at the blue block,
- The next 3 are just above the 3 previous,
- The next is at the green block and the 2 next going toward the blue box, on top,
- The next 9 are the same pattern one node toward the red block,
- And finally the next 9 are the same pattern starting at the red block
Each MapNode holds the node name and the probability to appear. See lua_api.txt, section Schematic specifier for more details.
A minimal table for a 3x3 bush sample:
local my_schematic = {
	size = {x = 3, y = 3, z = 3},
	data = {
		-- The side of the bush, with the air on top
		{name = "default:bush_leaves"}, {name = "default:bush_leaves"}, {name = "default:bush_leaves"}, -- lower layer
		{name = "default:bush_leaves"}, {name = "default:bush_leaves"}, {name = "default:bush_leaves"}, -- middle layer
		{name = "air"}, {name = "air"}, {name = "air"}, -- top layer
		-- The center of the bush, with stem at the base and a pointy leave 2 nodes above
		{name = "default:bush_leaves"}, {name = "default:bush_stem"}, {name = "default:bush_leaves"}, -- lower layer
		{name = "default:bush_leaves"}, {name = "default:bush_leaves"}, {name = "default:bush_leaves"}, -- middle layer
		{name = "air"}, {name = "default:bush_leaves"}, {name = "air"}, -- top layer
		-- The other side of the bush, same as first side
		{name = "default:bush_leaves"}, {name = "default:bush_leaves"}, {name = "default:bush_leaves"}, -- lower layer
		{name = "default:bush_leaves"}, {name = "default:bush_leaves"}, {name = "default:bush_leaves"}, -- middle layer
		{name = "air"}, {name = "air"}, {name = "air"}, -- top layer
	}
}
You can then provide my_schematic everytime a Schematic specifier is requested, for example in minetest.register_decoration.
Placing schematics
Schematics are placed either with minetest.place_schematic or at world generation with minetest.register_decoration.
When using minetest.register_decoration, be aware that the decoration is placed inside a ground node and not on top, unlike simple decorations. You may want to add one layer for the roots of the schematic. See also in lua_doc.txt about the documentation of minetest.register_decoration for the flags to center the schematic on certain axes instead of placing it from a corner. Notice that you can only place the schematic from the center or the start of every axis and not an arbitrary offset.
When using minetest.place_schematic, you can provide the offset manually by changing the reference pos.
Incomplete
Missing some explainations about yslice_prob against individual node probability
